Snap, copy and paste
Object snap to nodes, midpoints, crossings and plate centres; copying geometry by a base node so the paste joins the model; pasting loads onto targets.
Modeling 12 min read
A copy that lands 2 mm beside the structure looks connected and is not. It meshes as a separate node, and the solve finds a mechanism or a member that carries nothing. Object snap puts a point exactly on the model, and a paste resolves every copied node against what is already there, so the copy shares the existing nodes instead of standing next to them.
Object snap
While a point is being placed, the cursor latches onto the model within 10 px on screen. Snap is active for:
- the base node of a paste,
- Beam ends and the other tools that place at a node, such as a point load or a dialog asking for a node,
- the query point, and a query point being dragged,
- the cut tool,
- Place node in the Nodes table.
The distance is measured on screen, so it works the same at any zoom and from any camera angle. The point it returns is exact model geometry: a station on the member's own line, not a pixel projected back into the model.
| Snap | Marker | What it finds |
|---|---|---|
| Node | square | Existing nodes and plate corners |
| Intersection | × | Where two members, or a member and a plate edge, cross without a node |
| The tool's own point | diamond | Points the active tool adds: the query point's quarter points and the diagram's Max, Min and Zero, the cut tool's existing cut ends |
| Midpoint | triangle | The middle of a member or a plate edge |
| Centre | circle | The area centre of a plate, with holes subtracted |
| Nearest | hourglass | Any point along a member or a plate edge |
The table is in priority order, and priority beats distance: a node in range wins over a midpoint that is closer to the cursor, so corners hold the cursor and it does not jump between nearby points. Nearest wins only when nothing else is in reach. Between two candidates of the same kind, the one closer on screen wins.
Next to the marker, a label names the hit: Node · N20, Midpoint · E12,
Intersection · E3 × E7, Centre · P1, or Nearest · P1 edge 2 on a plate edge. While
the query point is being placed, only the marker is drawn, because its own preview already
names the point.
Intersection is tested in 3D. Two lines count as crossing only where they pass within 1 mm of each other, so a beam that crosses another on screen at a different height is not an intersection. A crossing at a member's end is a node, and Node finds it. Centre is the area centroid, not the average of the corners, so it is correct for an L-shaped slab too.
What a snapped point becomes
A tool that places a node uses the node already there when the snap is a Node. Any other snap creates a node at that point. A point on a member's span (a midpoint, a nearest point, a crossing) becomes an interior node of that member: the member stays one member, and the analysis mesh puts a node there. Elsewhere, the new node is free.
Placing a node
Place node in the toolbar of the Nodes table puts nodes at snap points: on members,
crossings, plate edges and centres, and drawing points. You can also type coordinates in
the hint strip, with @… measured from the last node placed. A node placed on a member
joins it as an interior node, and one placed on a plate joins the plate's connections, in
one undo step.
Turning it on and off
Press F3, or click Snap in the status bar. When it is off, the chip is struck through. Its tooltip says which state it is in, for example Object snap is on — click to turn it off (F3).
The caret beside the chip opens Snap to. There, Object snap is the same switch, and Node, Intersection, Midpoint, Centre and Nearest can each be turned off. All five are on by default.
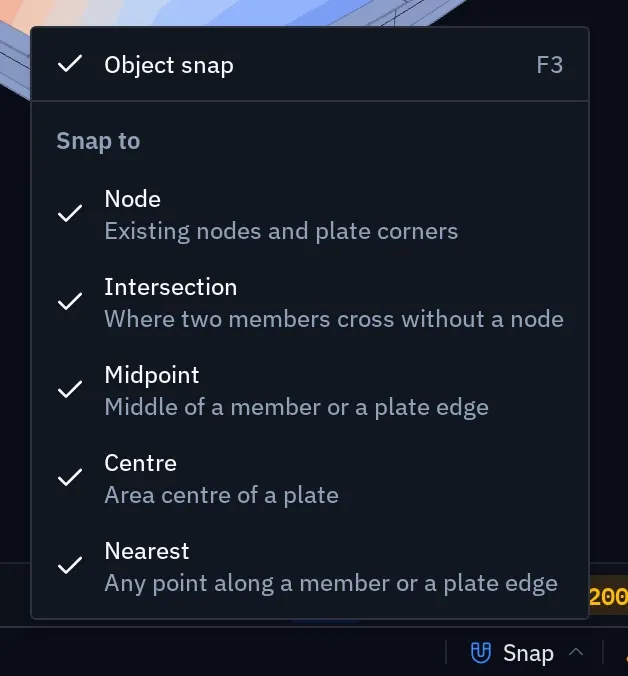
The switch and the chosen kinds belong to your browser, not to the project: they are how you like to draw, and a collaborator keeps their own. F3 also works in a read-only example. Turning Snap off also turns off the tool's own points (quarter points, cut ends). With Snap on and every kind unticked, the tool's own points are still offered.
In a 2D and a 3D viewer
The snap rules are the same in both. A 3D viewer offers the whole model. A 2D viewer offers only the geometry that lies in its plane, because a snap to a node behind the drawing would put the point off the plane you are looking at.
Snapping to a DXF underlay is a separate switch: Snap to drawings, under Display › Scene in a 3D viewer. F3 does not change it. Drawings are shown in 3D viewers only. When a model snap and a drawing snap are both in reach, the model snap wins, because the model is the structure being built.
Copying geometry
Select nodes, members and plates and press Ctrl C, or use Copy in the Clipboard group on Home, or Edit › Copy. Every node a selected member or plate needs is copied with it, including the corners of a plate's holes.
A copy is held by one of its nodes, the base node. A paste puts that node exactly where you point, and the rest of the copy follows at its copied offsets. The base node is chosen when you copy:
- With the pointer over a viewer, it is the copied node drawn nearest the pointer, within about 60 px. Point at the end you mean to put down, then press Ctrl C.
- Otherwise it is the lowest copied node, and among equally low nodes the one with the smallest x, then the smallest y.
You can hold the copy by a different node while placing it in a 3D viewer (B, below).
Pasting
Ctrl V starts the paste in the viewer under the pointer. If the pointer is not over a viewer, the paste uses the active viewer, then the one that hosted the last paste. With no viewer open, the copy is pasted at once, 1 m from the original in x and in y.
- Move the pointer. The copy follows, held by its base node. When the base node is in snap range of a node, a midpoint or another snap point, it lands exactly on it.
- Check the joints. In a 3D viewer, every copied node that will join the existing structure is drawn larger and green.
- Place it. Click, or press Enter. Esc cancels.
In a 3D viewer the preview shows the copied members and plate outlines as a grey
wireframe, with the copied supports and loads in the same grey. A prompt at the bottom of
the viewer reads Click where node N1 of the copy goes, followed by the offset from the
copied position (Δ x; y; z in the length unit), B hold by the node under the
cursor, and an Esc button. On a touch screen the button reads Cancel paste.
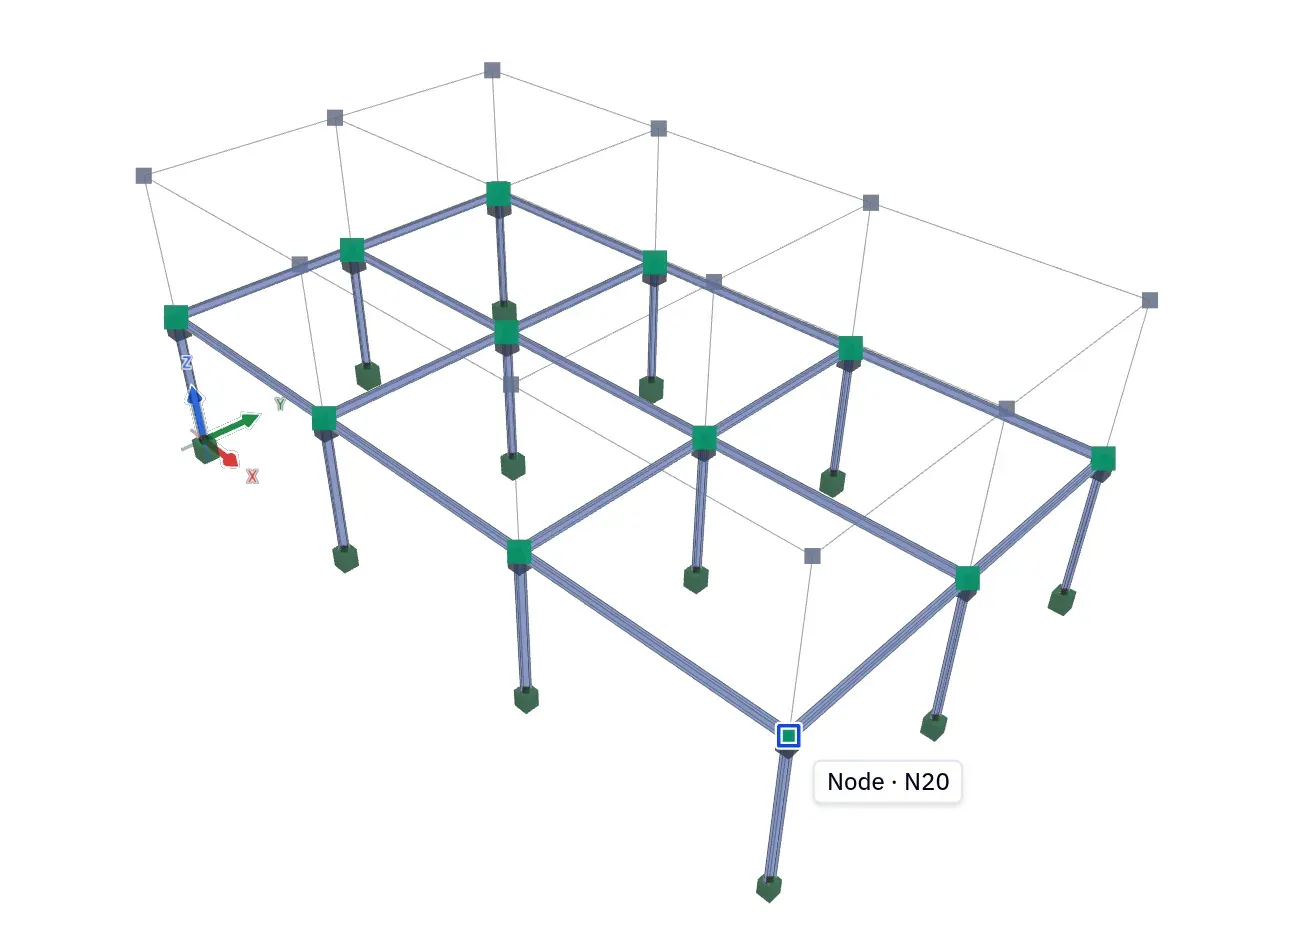
Between snaps, the base node follows the pointer on a horizontal working plane. It starts at the base node's own height and moves to the height of each snap. Snap once to a node one storey up, and the copy then moves at that level.
B holds the copy by the copied node drawn nearest the pointer instead. The preview stays where it is, and from then on that node follows the snap. Use it when the copy is held by a node that has nothing to land on. A slab copied while pointing at it is held by a top corner, and one storey up there is nothing at that corner to snap to. Press B over a column foot of the preview, then snap that foot to the slab.
In a 2D viewer the preview is a blue wireframe of the members and plate outlines only. There are no supports or loads in it, no green marks, no prompt and no B. Click, Enter and Esc work as in 3D, and the paste joins the model by the same rules.
How a paste joins the model
Every copied node is resolved against the model as it is placed. The tolerance is the model's node coincidence tolerance, 1 mm.
| The copied node lands | It becomes |
|---|---|
| Within 1 mm of an existing node | That node. No second node is created |
| On the span of an existing member, ends excluded | A new node, attached to that member as an interior node. The member is not split into two |
| Anywhere else | A new node |
In addition:
- An existing node lying on the span of a pasted member is attached to the pasted member. A beam pasted across existing column heads connects to them.
- A pasted member whose two ends landed on two nodes that a member already joins is left out, along with its loads. A plate whose outline matches an existing plate is left out the same way. Pasting a copy exactly onto itself adds nothing.
- Where a copied node lands on a node that has a support, the two supports are combined direction by direction: a rigid restraint on either side wins, an existing spring is kept, and a free direction takes the copy's. A spring that lands on the same spring is not doubled.
- A load or prescribed displacement that the existing node already carries, in the same case with the same values, is not added a second time.
- Plate connections are carried over between the copied plates. A pasted slab is connected to the pasted walls, never to the originals. A connection to something that was not copied is dropped. When the new geometry lies on a plate, Connect to plate? asks whether to connect it, as when drawing. See How other things attach.
After the paste, a message summarises what joined, for example 12 joints joined the model · 2 connections along members · 1 duplicate left out · 1 load already there. If the paste only added new geometry, no message appears.
The new nodes, members and plates are selected afterwards. The existing nodes that the copy joined are not, so a following move does not drag the structure the copy was pasted onto.
Ctrl Z undoes the paste in one step.
What a copy carries
| Copied | Not copied |
|---|---|
| Nodes, with all six support directions and their spring stiffnesses | Self-weight. It belongs to the load case and covers the whole model |
| Members, rigid arms, plates and load panels, with section, material, local axes, releases, eccentricity, rib, column head, divisions and groups; a plate with its thickness, holes and mesh size | Load cases. The copied loads stay in their own cases |
| Nodal loads and prescribed displacements on copied nodes | Line supports, query points and cuts, even when they are selected |
| Member, plate and edge loads on copied members and plates | A member's interior nodes that were not copied with it |
| Connections between copied plates | Connections to anything that was not copied |
Sections and materials are not duplicated: the copy uses the same ones as the original.
A graded surface load is defined in world coordinates. On a slab pasted somewhere else, it describes the same field in space as before, so it is not shifted with the slab. Check it after a paste.
Cut and Duplicate
Ctrl X copies the selection and then deletes it. If nothing could be copied, nothing is deleted. Ctrl D duplicates the selection straight away, 1 m from the original in x and in z. It uses the same join rules and does not change what is on the clipboard.
Copy works in a read-only example. Cut, Paste and Duplicate change the model, so they are not available until you copy the example with Make it mine.
Copying loads
Select only loads (click the load glyphs in a viewer) and press Ctrl C. The clipboard then holds the loads themselves, not the nodes or members they act on. There is one clipboard: copying loads replaces copied geometry, and copying geometry replaces copied loads. When the selection contains geometry as well as loads, it is copied as geometry, and the copy carries its loads.
A pasted load keeps its load case, its values and its axes. Each load goes only onto targets of its own kind:
| Copied load | Pastes onto |
|---|---|
| Point force or moment, prescribed displacement | Nodes |
| Uniform or graded load on a member | Members |
| Temperature | Members or plates |
| Surface load, uniform or graded | Plates and load panels |
| Edge load | Plate edges |
Self-weight cannot be copied. A graded member load pasted onto a member drawn the other way round has its start and end values swapped, so the heavier end stays on the same side of the structure.
Onto the selection
Select the targets and press Ctrl V. The loads go onto every selected target that can take them, as one edit. A message reports the result, for example Pasted 6 loads. A target that already carries the same load, in the same case with the same values, is skipped and reported: 1 load already there.
One target at a time
With nothing selected that can take the loads, Ctrl V arms a load brush. The prompt names what to click, for example Click members to paste the copied load. Each click puts the copied loads on the node, member, plate or plate edge under the cursor, and Esc finishes. In a 3D viewer the brush shows the loads on the target under the cursor before you click. Clicking a target that already carries the load shows That already carries this load.
The brush takes the kind of the first copied load. Other copied loads are added where the target can take them.
A force can also go on a point along a member. Its prompt reads Click nodes — or a point on a member — to paste the copied load. With snap on, click a member's midpoint or any point on it: a node is created there, attached to the member, and the force is applied to that node.
Cutting a load (Ctrl X) and pasting it moves it to the new target.
Keys
| Keys | Does |
|---|---|
| F3 | Turn object snap on or off |
| Ctrl C | Copy the selection; loads alone copy as loads |
| Ctrl X | Cut: copy, then delete |
| Ctrl V | Paste geometry with a preview, or paste copied loads onto the selection or with the brush |
| Ctrl D | Duplicate the selection beside itself |
| Click · Enter | Place the paste |
| B | Hold the paste by the copied node nearest the pointer (3D viewer) |
| Esc | Cancel the paste, or finish the load brush |
Limits
- The pick radius (10 px) and the join tolerance (1 mm) are fixed.
- B, the green joint marks and the preview of supports and loads are in 3D viewers only.
- A paste moves the copy. It does not rotate it. Use Mirror for a reflected copy.
- A node created at an Intersection is attached to one of the two crossing members, not to both. Check the other member if both must connect there.
- In a dense view, only the 24 lines nearest the cursor are tested for crossings.
Related
Drawings & snapping covers snapping to DXF underlays. Supports and releases explains what the combined support on a joined node means. Load cases describes the load types that the load clipboard carries.
Something wrong or unclear on this page? Tell us, and it gets corrected.